Getting Started with Tickets SDK for iOS
This guide will walk you through integrating the Ticketmaster Tickets SDK into your iOS application. By the end of this guide, you'll have the SDK installed and displaying tickets in your app.
Prerequisites
Before you begin, ensure you have:
Xcode 26.2+ (for SDK version 3.17.0+)
iOS 17+ deployment target
Swift 6.2.3+
Ticketmaster API Key - Get yours from Ticketmaster Developer Portal
Apple Developer Account - Required for code signing
What You'll Build
In this guide, you'll:
Install the Tickets SDK frameworks
Configure Authentication SDK (required dependency)
Configure Tickets SDK
Display the tickets view in your app
Verify your integration
Time to complete: 15-20 minutes
Step 1: Install the SDK
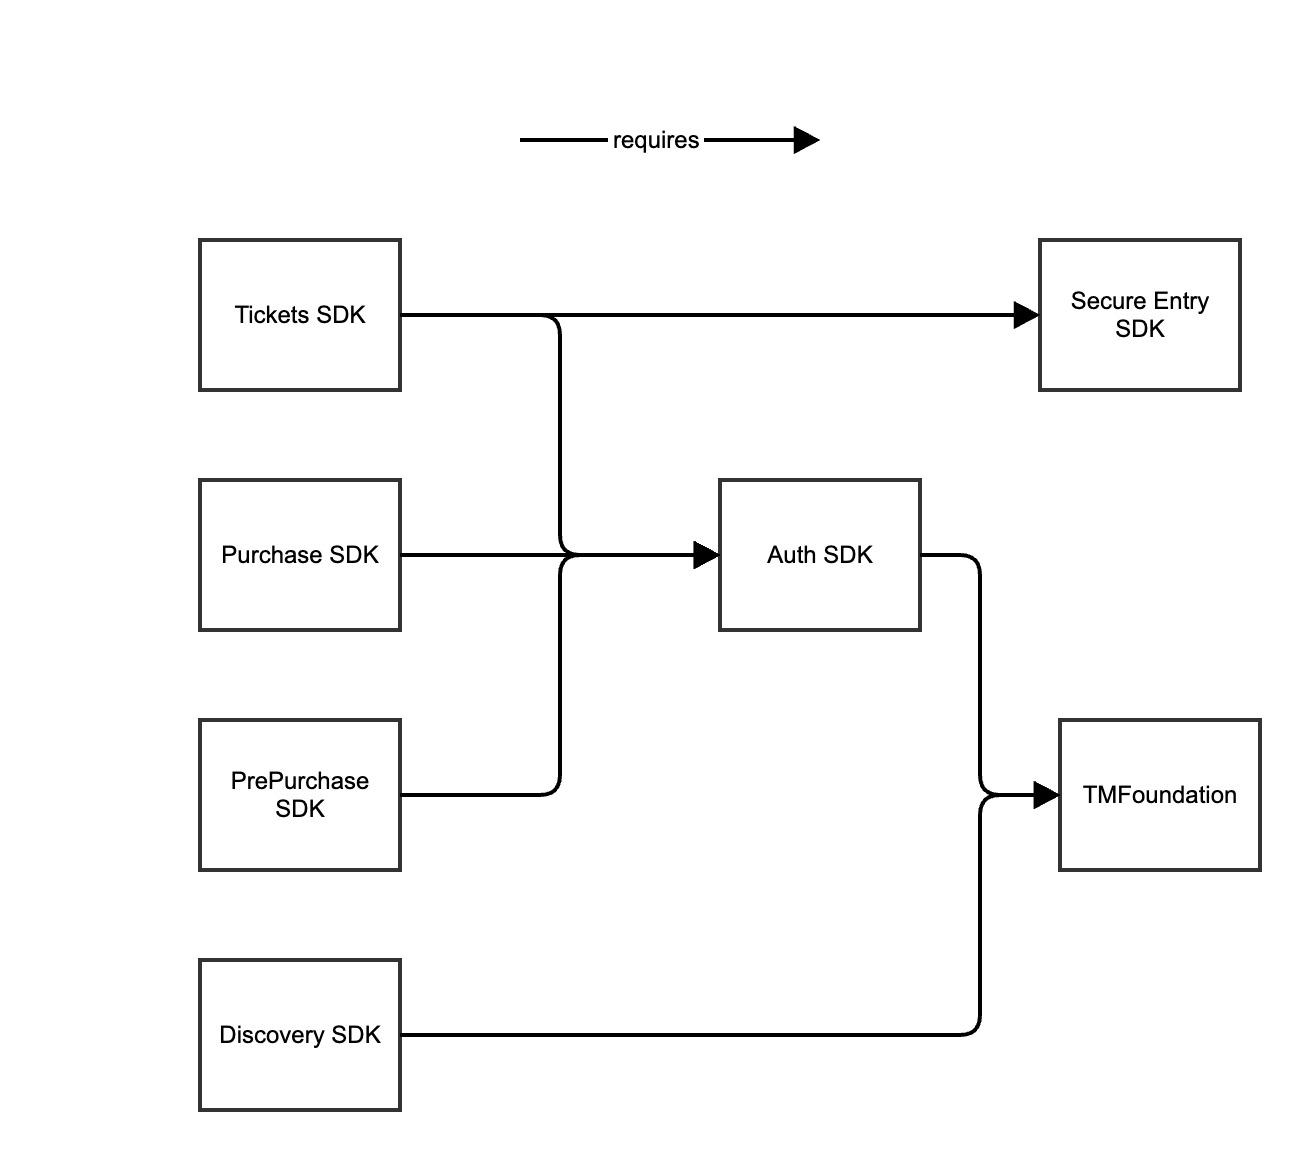
The Tickets SDK consists of three frameworks that work together:
TicketmasterTickets - Main Tickets SDK
TicketmasterSecureEntry - Secure barcode rendering (SafeTix, QR codes, PDF417)
TicketmasterSwiftProtobuf - Protobuf support for encryption
Installation via Swift Package Manager (Recommended)
Swift Package Manager (SPM) is the easiest way to integrate the SDK and keep it up to date.
1.1 Add Package Dependency
In Xcode, select File > Add Package Dependencies
Enter the repository URL:
https://github.com/ticketmaster/iOS-TicketmasterSDKSelect the version rule:
Recommended: "Up to Next Major Version" starting from
1.19.0(latest stable)Or specify an exact version from the Releases page
Click Add Package
1.2 Select Frameworks
When prompted, add these frameworks to your app target:
✅
TicketmasterAuthentication(required)✅
TicketmasterFoundation(required)✅
TicketmasterTickets(required)✅
TicketmasterSecureEntry(required)✅
TicketmasterSwiftProtobuf(required)
Note: You may also see TicketmasterDiscovery, TicketmasterPrePurchase, and TicketmasterPurchase. These are optional and only needed if you're implementing the full Retail SDK.
Alternative: Manual XCFramework Installation
If you prefer not to use SPM:
Download the latest release from GitHub Releases
Extract the
.xcframeworkfilesDrag them into your Xcode project
Ensure Embed & Sign is selected in your target's Frameworks, Libraries, and Embedded Content
iOS framework dependencies reference
The Ticketmaster SDK is modular — include only the frameworks for the features you use.
Note: For a standard Tickets SDK integration (this guide), you need the five frameworks listed in Step 1.2 above. The Purchase, PrePurchase, and Discovery SDK products are part of the Retail SDK and are optional.
Step 2: Import the Frameworks
In the file where you'll configure the SDK (typically your App or AppDelegate or a configuration manager), import the required frameworks:
import SwiftUI // or import UIKit
import TicketmasterFoundation
import TicketmasterAuthentication
import TicketmasterTickets
Step 3: Configure Authentication SDK
The Tickets SDK depends on Authentication SDK for user login and API access. You must configure Authentication SDK before configuring Tickets SDK.
3.1 Create Your Configuration Settings
// In your App / AppDelegate or initial view / view controller
func configureTicketmasterSDK() {
    // Replace with your actual API key from https://developer.ticketmaster.com/
    let apiKey = "YOUR_API_KEY_HERE"
    // Configure for your region and environment
    let tmxSettings = TMAuthentication.TMXSettings(
        apiKey: apiKey,
        region: .US,              // Options: .US, .UK
        environment: .Production  // Options: .Production, .Staging, .QA
    )
    // Optional: Customize branding
    let branding = TMAuthentication.Branding(
        displayName: "My App",
        backgroundColor: .systemBlue,
        foregroundColor: .white
    )
    let settings = TMAuthentication.BrandedServiceSettings(
        tmxSettings: tmxSettings,
        branding: branding
    )
    // Configure Authentication SDK
    TMAuthentication.shared.configure(brandedServiceSettings: settings) { backendsConfigured in
        print("Authentication configured with \(backendsConfigured.count) backend(s)")
        // Now configure Tickets SDK
        self.configureTicketsSDK()
    } failure: { error in
        print("❌ TMAuthentication configuration failed: \(error.localizedDescription)")
    }
}
3.2 When to Call This
Call configureTicketmasterSDK() early in your app lifecycle or before first use.
@main
class AppDelegate: UIResponder, UIApplicationDelegate {
    func application(_ application: UIApplication,
                    didFinishLaunchingWithOptions launchOptions: [UIApplication.LaunchOptionsKey: Any]?) -> Bool {
        configureTicketmasterSDK()
        return true
    }
}
@main
struct MyApp: App {
    init() {
        configureTicketmasterSDK()
    }
    var body: some Scene {
        WindowGroup {
            ContentView()
        }
    }
}
Step 4: Configure Tickets SDK
Once Authentication is configured, set up the Tickets SDK:
func configureTicketsSDK() {
    // Optional: Set branding colors (can also be done before configure)
    TMTickets.shared.brandingColorsOverride = TMTickets.BrandingColors(
        navBarColor: .systemBlue,
        buttonColor: .systemBlue,
        textColor: .white,
        ticketColor: .systemBlue,
        theme: .light  // or .dark
    )
    // Optional: Set delegates (see "Next Steps" below)
    // TMTickets.shared.orderDelegate = self
    // TMTickets.shared.analyticsDelegate = self
    // TMTickets.shared.moduleDelegate = self
    // Configure Tickets SDK
    TMTickets.shared.configure {
        print("Tickets SDK configured successfully")
        // SDK is ready to use
        self.enableTicketsFeature()
    } failure: { error in
        print("Failed to configure Tickets SDK: \(error.localizedDescription)")
    }
}
Key Configuration Options
You can customize the SDK before calling configure():
// Branding
TMTickets.shared.brandingColorsOverride = BrandingColors(...)
TMTickets.shared.brandingColorButtonOverride = false  // Use TM blue for specific buttons
TMTickets.shared.brandingColorNavBarOverride = false  // Don't brand nav bar
TMTickets.shared.brandingTeamLogoImage = UIImage(named: "teamLogo")
TMTickets.shared.useTMBrandedTicket = false  // Remove TM logo stripe from tickets
// Advanced (usually not needed)
TMTickets.shared.brandingEventsPageBackgroundOverride = UIImage(named: "background")
Step 5: Display Tickets
Once configured, you can present the Tickets SDK UI. There are three presentation methods:
Method 1: Push on Navigation Stack (Recommended)
Best for apps that use a UINavigationController:
func showTickets() {
    let ticketsVC = TMTicketsViewController()
    navigationController?.pushViewController(ticketsVC, animated: true)
}
Method 2: Modal Presentation
Easiest to integrate if you don't have a navigation controller:
func showTickets() {
    let ticketsVC = TMTicketsViewController()
    present(ticketsVC, animated: true)
}
Method 3: Embedded View
For custom layouts where you want to embed tickets in your own UI:
func embedTickets() {
    let ticketsView = TMTicketsView()
    // Add to your view hierarchy
    view.addSubview(ticketsView)
    // Setup constraints
    ticketsView.translatesAutoresizingMaskIntoConstraints = false
    NSLayoutConstraint.activate([
        ticketsView.topAnchor.constraint(equalTo: view.topAnchor),
        ticketsView.leadingAnchor.constraint(equalTo: view.leadingAnchor),
        ticketsView.trailingAnchor.constraint(equalTo: view.trailingAnchor),
        ticketsView.bottomAnchor.constraint(equalTo: view.bottomAnchor)
    ])
    // Start the Tickets SDK with this view
    TMTickets.shared.start(ticketsView: ticketsView, callSource: "MyApp")
}
Step 6: Verify Your Integration
Test Checklist
Build the app: Ensure there are no compilation errors
Run the app: Verify the SDK initializes without crashes
Check logs: Look for configuration success messages in the console
Login: When you present the tickets view, you should see a login screen
View tickets: After logging in with a Ticketmaster account that has tickets, you should see the events and tickets
Expected Console Output
Authentication configured with X backend(s)
Tickets SDK configured successfully
Troubleshooting
If you encounter issues:
"Invalid API Key" error:
Verify your API key is correct
Ensure it's active on the Developer Portal
Check that you're using the right environment (.Production vs .Staging)
"Module not found" errors:
Clean build folder (⌘ + Shift + K)
Clean derived data
Restart Xcode
Verify all required frameworks are added to your target
Crashes on launch:
Ensure you configured Authentication SDK before Tickets SDK
Verify all frameworks are embedded and signed
Check minimum iOS version (17.0+)
No tickets showing after login:
Ensure the logged-in account has purchased tickets
Check the API key has access to the correct backend (Host/Archtics)
Look for error messages in the console
Complete Minimal Example
Here's a complete minimal example that ties everything together:
import UIKit
import TicketmasterAuthentication
import TicketmasterTickets
class ViewController: UIViewController {
    private var isConfigured = false
    override func viewDidLoad() {
        super.viewDidLoad()
        title = "My App"
        view.backgroundColor = .systemBackground
        // Add a button to show tickets
        let showTicketsButton = UIButton(type: .system)
        showTicketsButton.setTitle("View My Tickets", for: .normal)
        showTicketsButton.addTarget(self, action: #selector(showTicketsTapped), for: .touchUpInside)
        showTicketsButton.translatesAutoresizingMaskIntoConstraints = false
        view.addSubview(showTicketsButton)
        NSLayoutConstraint.activate([
            showTicketsButton.centerXAnchor.constraint(equalTo: view.centerXAnchor),
            showTicketsButton.centerYAnchor.constraint(equalTo: view.centerYAnchor)
        ])
        // Configure SDK
        configureSDK()
    }
    func configureSDK() {
        // Step 1: Configure Authentication
        let tmxSettings = TMAuthentication.TMXSettings(
            apiKey: "YOUR_API_KEY_HERE",
            region: .US,
            environment: .Production
        )
        let branding = TMAuthentication.Branding(
            displayName: "My App",
            backgroundColor: .systemBlue,
            foregroundColor: .white
        )
        let settings = TMAuthentication.BrandedServiceSettings(
            tmxSettings: tmxSettings,
            branding: branding
        )
        TMAuthentication.shared.configure(brandedServiceSettings: settings) { [weak self] backendsConfigured in
            print("✅ Authentication configured: \(backendsConfigured.count) backend(s)")
            // Step 2: Configure Tickets
            TMTickets.shared.configure {
                print("✅ Tickets SDK configured successfully")
                self?.isConfigured = true
            } failure: { error in
                print("❌ Tickets SDK configuration failed: \(error.localizedDescription)")
            }
        } failure: { error in
            print("❌ TMAuthentication configuration failed: \(error.localizedDescription)")
        }
    }
    @objc func showTicketsTapped() {
        guard isConfigured else {
            print("⚠️ SDK not yet configured")
            return
        }
        let ticketsVC = TMTicketsViewController()
        navigationController?.pushViewController(ticketsVC, animated: true)
    }
}
What's Next?
Now that you have the basic integration working, explore these topics:
Essential Next Steps
Integration Examples - Explore code examples to furhter customize your integration.
Sample App - Explore a complete example implementation provided by Ticketmaster.
Advanced Features
Analytics - Track user behavior and page views
Custom Modules - Add custom content to the tickets page
Multi-Backend Support - Support multiple teams/venues
Developer Resources
Troubleshooting - Solutions to common issues
Need Help?
Support or Issues: Contact your Ticketmaster integration representative
GitHub: iOS-TicketmasterSDK
Summary
You've successfully integrated the Tickets SDK! Here's what you accomplished:
Installed the SDK frameworks via Swift Package Manager
Configured Authentication SDK with your API key
Configured Tickets SDK with optional branding
Displayed the tickets view in your app
Verified your integration works
Your users can now view, manage, and use their Ticketmaster tickets directly in your app!